Thank you for taking part in the NotSlot journey!
We invite you to join us in our next chapter:


World Bending Effect
In this article, we will recreate the Animal Crossing’s World Bending effect in Unity. Trust me, you will be surprised how simple it is! But we’re not stopping there, we will also explore how we can take it to the next level...
The World Bending effect brings in the horizon and the skyline, allowing both the ground and sky to be visible at the same time.
This is done by what Nintendo calls the “Rolling Log” effect, in which the terrain seems to bend and roll beneath the players while they wander around.
Origin
The effect has an interesting origin, as the producer of Animal Crossing: Wild World once described:
For the Nintendo DS, it made more sense to use this effect in order to show the sky in the upper screen, in oppose to a scrolling camera.
— Katsuya Eguchi, IGN (2005)
Scene Building
After creating a new Universal Render Pipline project, I went ahead and created a fun scene we can work with. It has a boat for the player to control.
One thing to note regarding the scene, the effect requires meshes with a sufficient amount of polygon count. If your mesh poly count is too low – it will harm the desired look.
If you need more inspiration for your scenes, Animal Crossing is not the only game using this effect. It was also featured in games like DeathSpank, Subway Surfers, and more...
Shader Graph
I created a Lit Shader Graph named World Bending:
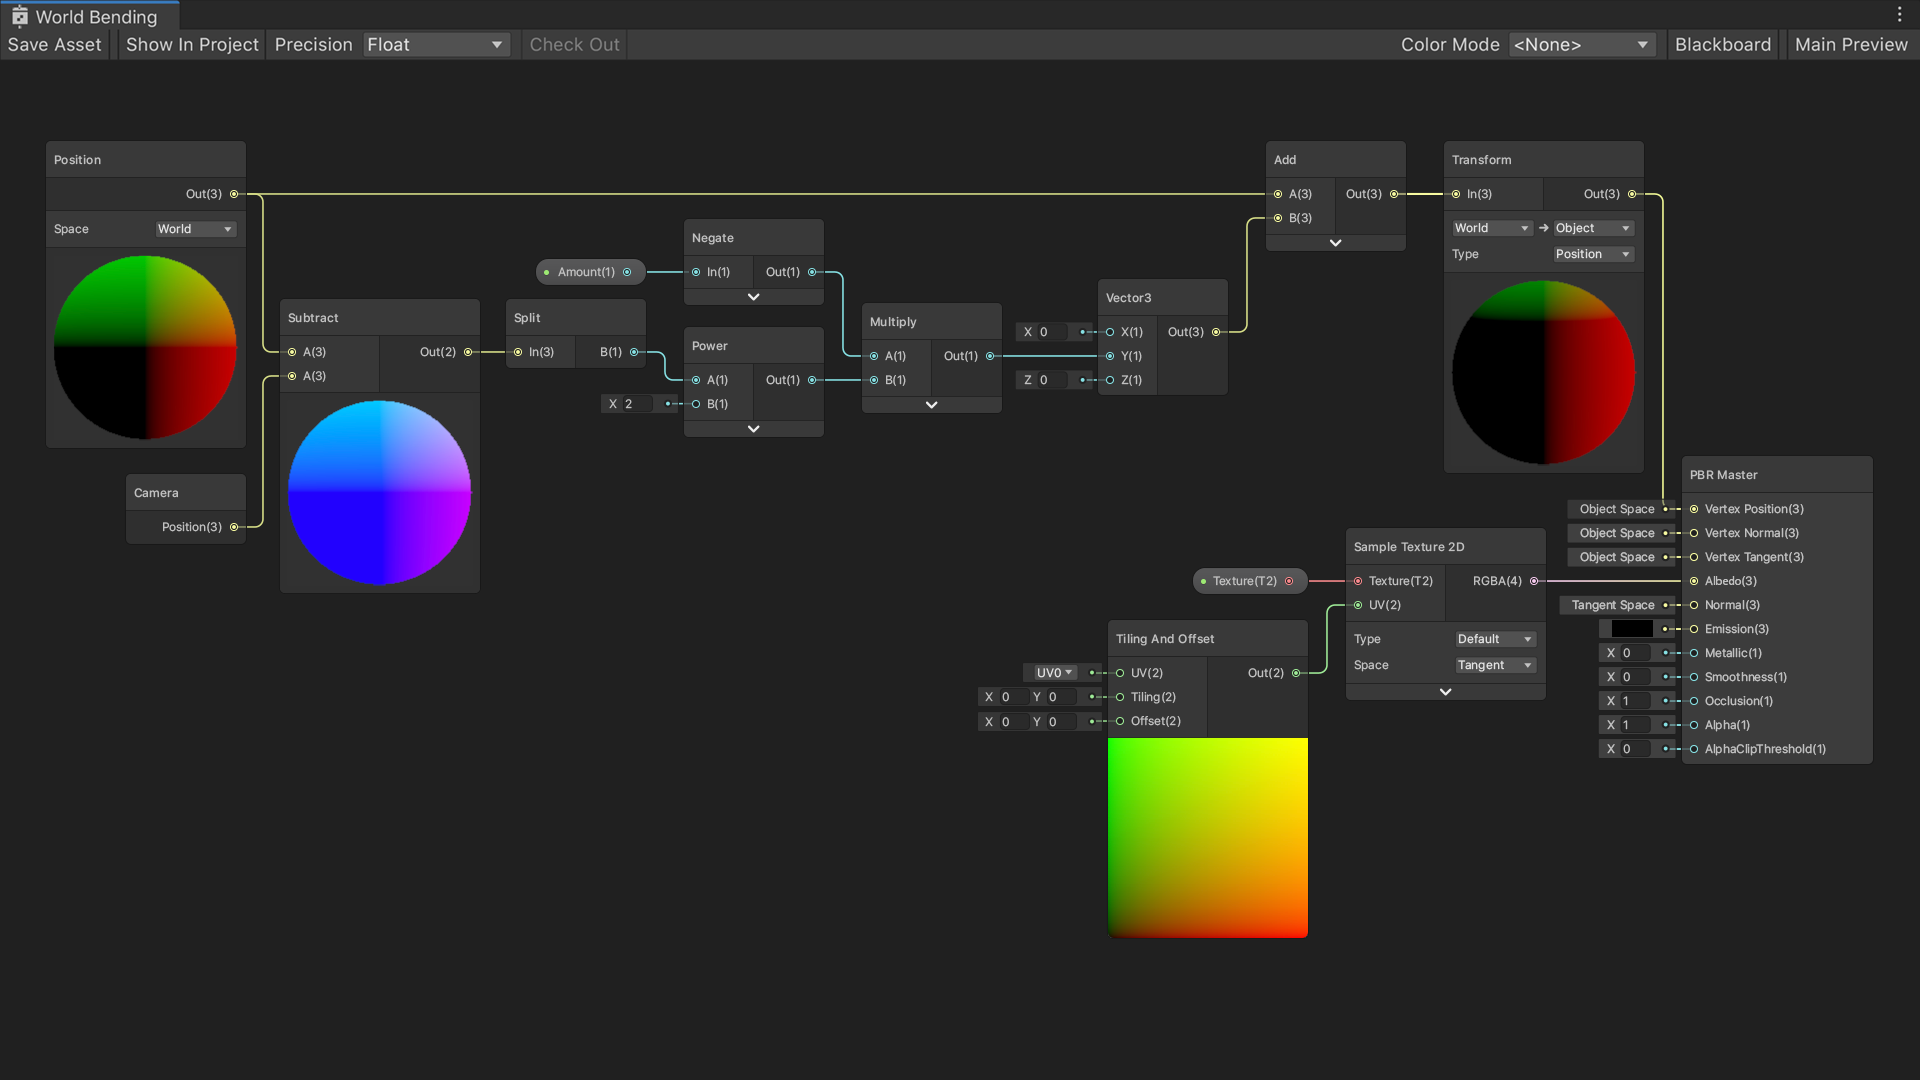
It has two properties: a Texture and a Vector1. The Amount Vector1 property expects tiny numbers, so I set it to a slider between .005 and .1.
- To kick things off, we calculate the distance from the vertex to the camera. We only care about the distance of the
Z-axis, so we split it. - To achieve the curved look, we multiply the Amount by an exponent of the distance.
- We can now add our shifted
Yposition to the vertex world position. - Since the Vertex Shader expects an Object Space position, we convert the position from World Space into Object Space.
- Now all that remains to do is to connect the new position into the
Vertex Positionof the Master node.
The fundamental shader graph is now ready.
Let’s see our shader in action...
An advantage of the World Bending effect is that it allows us to present only a fraction of the world at any given moment. At the same time, we aren’t actually limited to the surface area of a cylinder or a sphere – so we can create infinite large worlds.
Rendering Effects
I added a moderate amount of fog by going to Window > Rendering > Lighting Settings. In this window, I ticked Fog and set the appropriate distances for my scene.
I also added post-processing effects. Just a subtle touch of vignette and depth-of-field.
Zooming Behavior
In Animal Crossing, Whenever a dialogue kicks in, the camera changes two parameters. The first one is obviously the distance, the other one is the angle.
I added Cinemachine to the project and created two cameras. The Main camera angle is set to 50 and has a distance of 14. On the other hand, the Zoom camera angle is set to 30 and has a distance of 10.
I created a CamZone script that expects a Cinemachine virtual camera:
- When it starts, it disables the camera
- It will only activate and deactivate the virtual camera based on a player entering and exiting the trigger.
On my bridge object, I created a trigger collider, added the script to it, and passed in the Zoom virtual camera.
Now when the boat passes under the bridge, we have a nice zooming behavior.
If you want to learn more about Cineamchine and Camera Zones, check out my article about it.
Culling
You may have noticed as the world rolls, background objects in the distance abruptly disappear instead of rolling all the way down.
This is an issue caused by the camera’s frustum culling.
The camera’s frustum is the area of the scene that is visible to the player. The Unity renderer ignores the objects outside of the frustum. In the illustration, we see that the trees inside the frustum are highlighted and rendered.
Our shader runs on the GPU and modifies the position of the objects before rendering them.
The CPU is not aware of the modifications made on the GPU. We can see this conflict if we select an object and move it – notice how the orange selection outline is not synchronized with the rendered object.
As our shader curves the world, it inserts more objects into the field of view. As a result, Unity renderer’s culling step, which runs on the CPU, ignores objects that are inside the field of view, but outside the frustum.
The illustration presents the same trees, both with and without the shader. It highlights the trees that are inside the frustum and rendered. The blue trees are modified by the shader – notice that some blue trees are inside the frustum but aren’t highlighted and rendered.
Our simple solution is to render with the normal frustum, but when Unity culls are objects, we use a modified frustum.
We will create a custom orthographic frustum with a larger field of view.
Notice that the blue trees are always highlighted when inside the frustum, therefore they are always rendered when we see them.
using UnityEngine;
using UnityEngine.Rendering;

public class BendingManager : MonoBehaviour
{
  #region MonoBehaviour

  private void OnEnable ()
  {
    if ( !Application.isPlaying )
      return;

    RenderPipelineManager.beginCameraRendering += OnBeginCameraRendering;
    RenderPipelineManager.endCameraRendering += OnEndCameraRendering;
  }

  private void OnDisable ()
  {
    RenderPipelineManager.beginCameraRendering -= OnBeginCameraRendering;
    RenderPipelineManager.endCameraRendering -= OnEndCameraRendering;
  }

  #endregion


  #region Methods

  private static void OnBeginCameraRendering (ScriptableRenderContext ctx,
                                              Camera cam)
  {
    cam.cullingMatrix = Matrix4x4.Ortho(-99, 99, -99, 99, 0.001f, 99) *
                        cam.worldToCameraMatrix;
  }

  private static void OnEndCameraRendering (ScriptableRenderContext ctx,
                                            Camera cam)
  {
    cam.ResetCullingMatrix();
  }

  #endregion
}
I created a BendingManager script:
- When it loads, I register for camera rendering events from the rendering pipeline manager.
- When the camera renders, we provide it with our modified frustum based on its location.
Gone are the culling issues!
Editor Mode
By now, we have achieved the desired look & feel. But modifying the scene is, to say the least, not a pleasant experience.
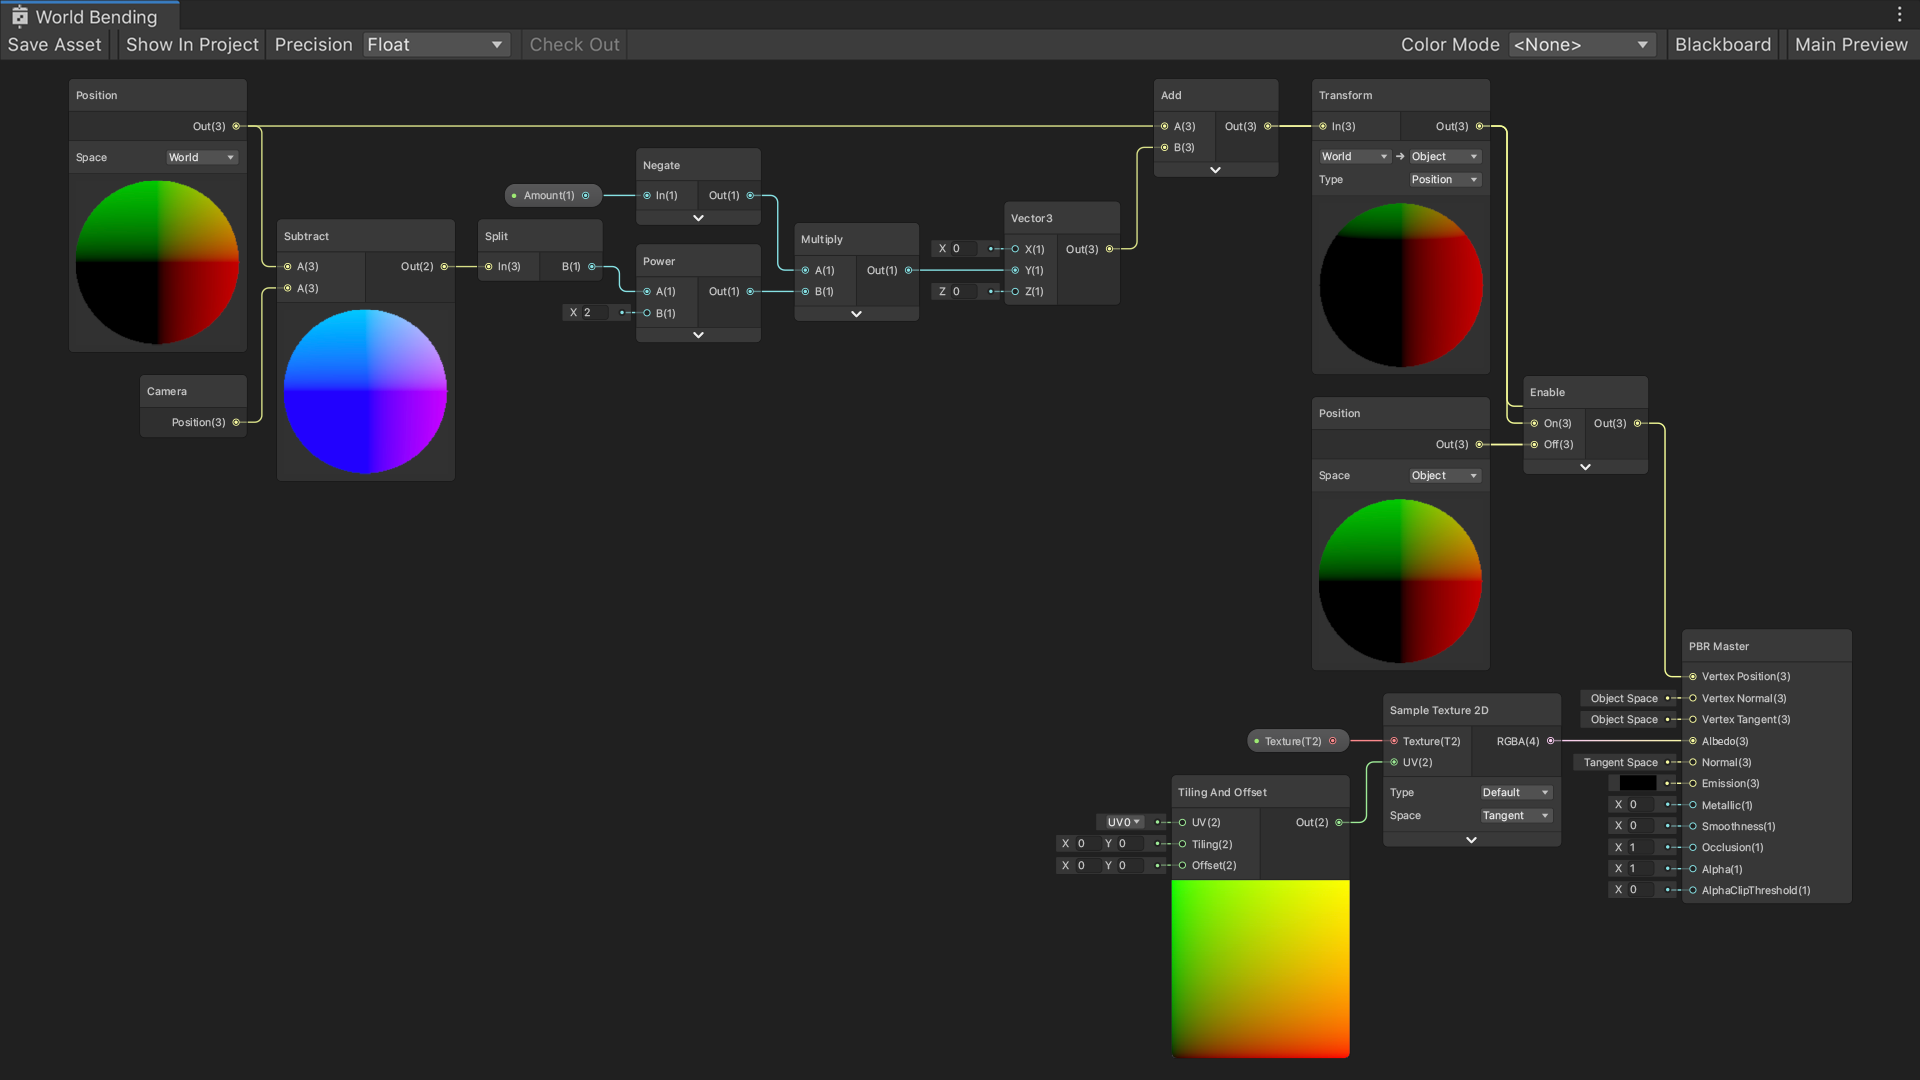
In the shader graph, I added a global multi compile boolean keyword and named its reference ENABLE_BENDING.
I modified the shader, so the effect only takes place when the keyword is enabled.
I added an attribute and some more lines in top of the BendingManager script.
When it awakes, I enable and disable the keyword depending on whether we are in play mode or not.
[ExecuteAlways]
public class BendingManager : MonoBehaviour
{
  #region Constants

  private const string BENDING_FEATURE = "ENABLE_BENDING";

  #endregion


  #region MonoBehaviour

  private void Awake ()
  {
    if ( Application.isPlaying )
      Shader.EnableKeyword(BENDING_FEATURE);
    else
      Shader.DisableKeyword(BENDING_FEATURE);
  }

  // ...
Now when the editor is not playing, the scene is presented normally.
Level Up
I modified the shader by adding a horizontal curve in addition to the depth curve. This will result in an effect that resembles a sphere as opposed to a log.
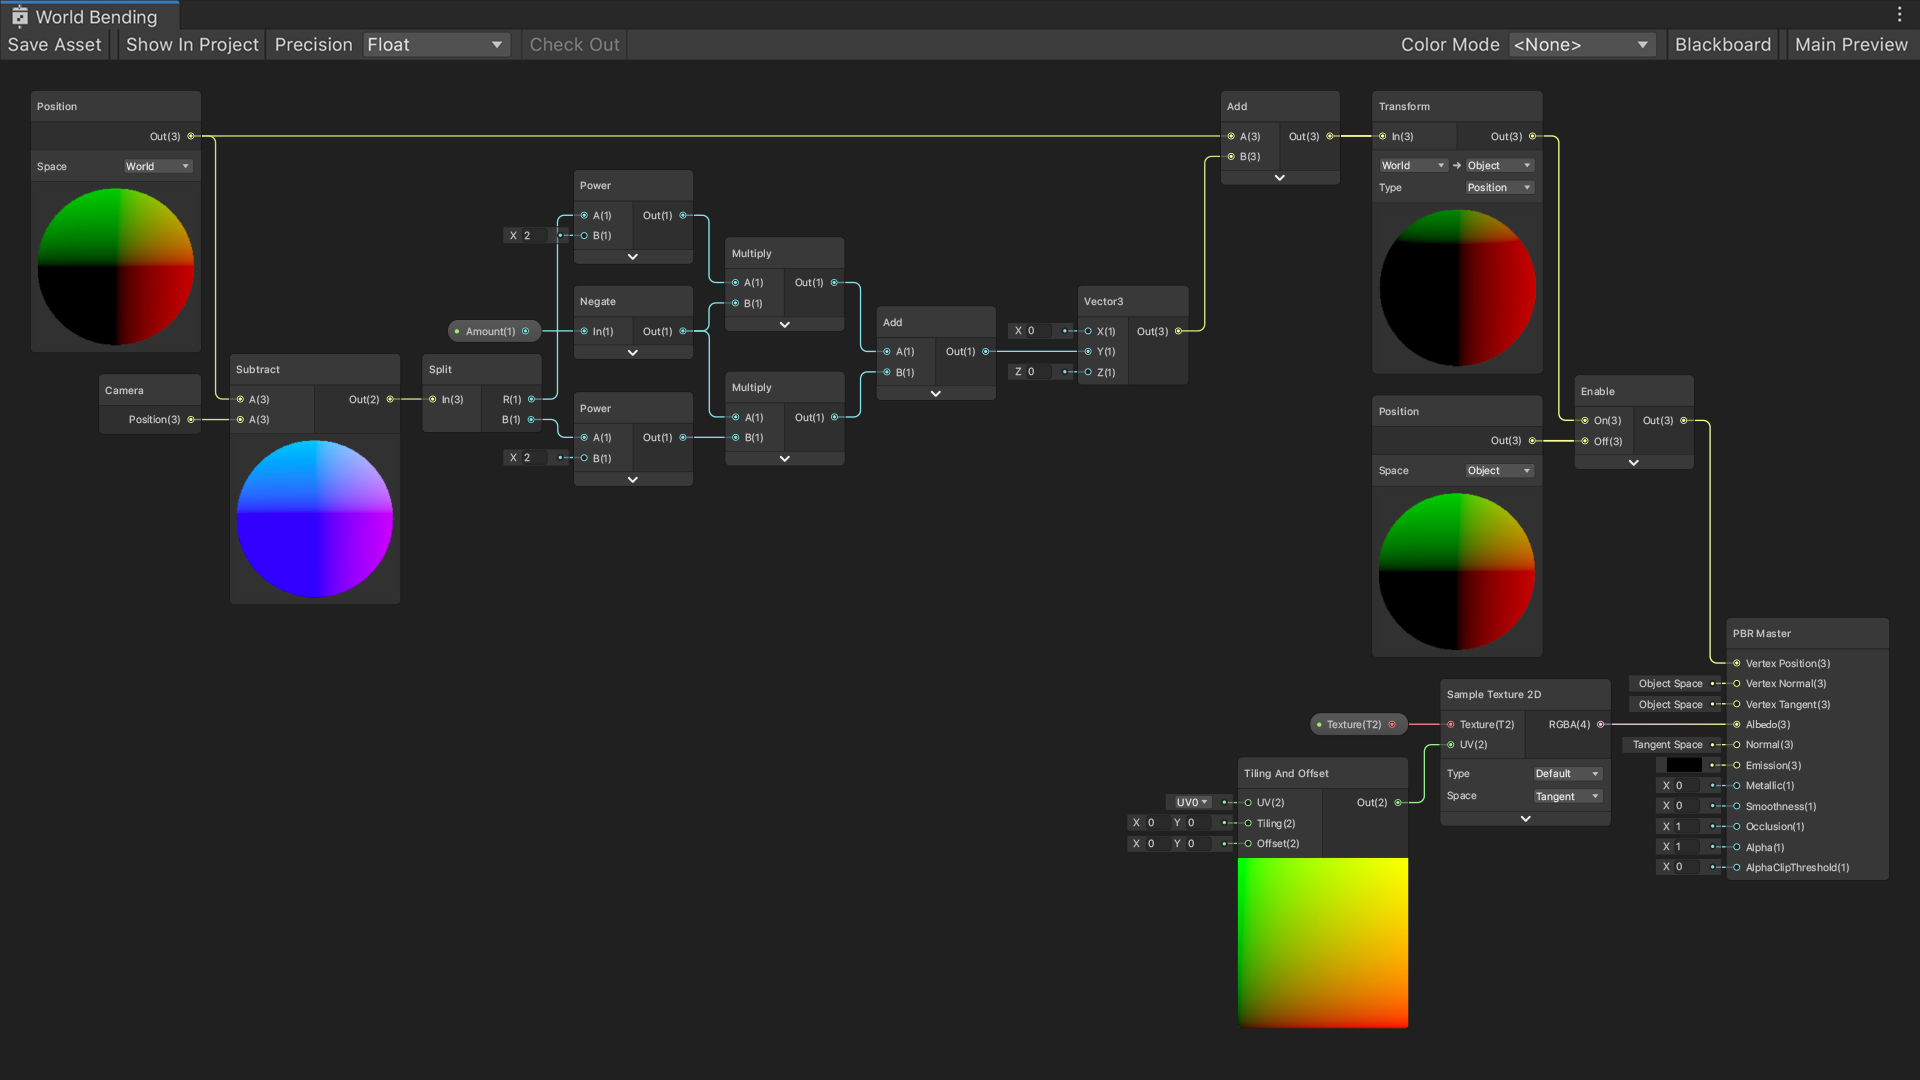
Now when we move, you can see how the world bends in both axes. It seems as we are on the edge of a planet.
Speaking of a planet... This effect has 3 parameters that we can play with to achieve a different look & feel: curvature amount, camera rotation, and camera position.
Let’s look at what happens when we change the camera rotation to 90 degrees and move it further away.
We now have a planet we can sail on!
Altering the curvature amount will change the planet’s size.