Thank you for taking part in the NotSlot journey!
We invite you to join us in our next chapter:

Spine Breakdowns 3 Skins Shark
This breakdown tutorial shows the steps of how I created a 2D sharks animation in Spine, which includes multiple animations in multiple directions with various skins. The tutorial includes some tips that have saved me a lot of work and time when creating our game Nugget & Penny.
In the final Spine file, we have three sharks Skins with some animations in 3 different directions, like Idle, Swim, and Eat.
PSD File Preparation
Let's look at how we prepare the Photoshop file.
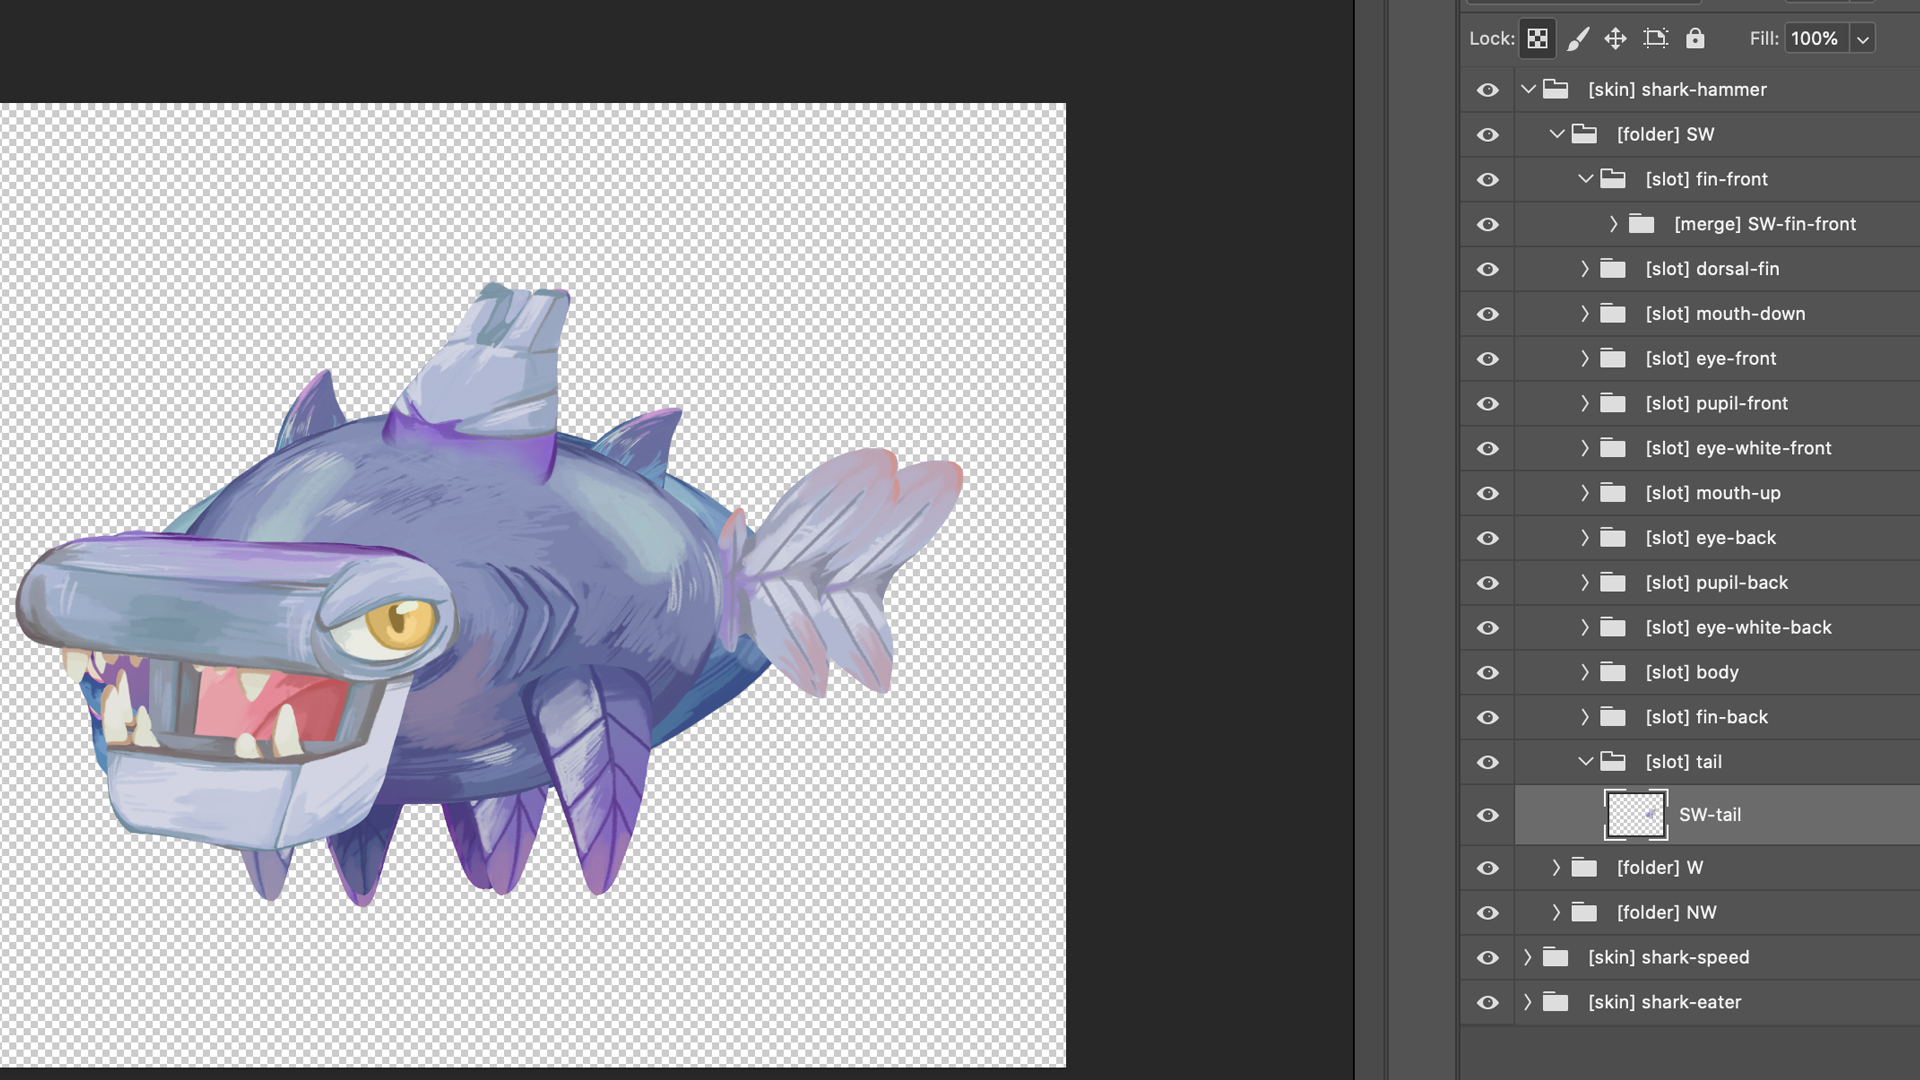
When we work with the PhotoshopToSpine script, we need to place all layers under folders and tag the folders to communicate our intentions for the script.
These sharks are designed to move in six directions, so we need to create all of their different directions. To save time, I deliberately made the sharks symmetric, and by this, we only need to create three directions – South–West, West, and North–West. Later on, inside a game engine like Unity or Unreal, we can use a script to mirror the animations to achieve all of the six directions.
Our three root folders are the Skin folders, one folder for each type of shark.
We create three direction folders for each Skin, tag them with the [folder] tag and name it only with the direction name without any addition.
Under these folders, we place the Slot folders.
We give each slot folder a descriptive name of a body part and prefix it with a [slot] tag.
Under the Slot folder, we can place a single layer with the art. Its name will contain its relevant direction and the name of the Slot folder it placed under.
If we need multiple layers, we can create a wrapping folder for them prefixed by the [merge] tag that will be merged into a single attachment after export.
One last thing before exporting:
To control the root pivot point of the character within the Photoshop file, we click on the ruler corner, and while holding the mouse down, drag the cursor to a position of your choice.
If you can't see the rulers, Control + R in Windows or CMD + R in Mac will show and hide them.
Spine File Preparation
Once the script completes exporting, we can see its results under the folder where we saved the PSD. We will have a JSON file and an Images folder, filed with folders for each Skin with folders for each direction.
We import the JSON file by going to Spine > Import Data and searching for the right folder.
We rearrange the drawing order and make sure we got it right with all the Skins. Click the Angle brackets (< and >) to navigate between the different Skins.
In the Setup mode, I choose to show the South–West direction, and we place the bones based only on this direction while ignoring the other two. The tricky part of these characters is the mouth as the mouth position changes for each Skin. In this case, we can place the bones in an average position that will match all Skins – it doesn't have to be precise, the more important thing is that it will be convenient for us the animators.
To attach the bones to their relevant slots, we click on the attachment and press P, and then we click on the bone we choose to set it as the parent.
Now, focusing on the two other directions: We are going to reposition the West and North-West attachments, and we will use a duplicated skeleton as a reference for their original positions.
We take the attachments and reposition them to their relevant bones. After we finish repositioning the attachments, we go to Animate Mode and create what I call the Directions Bank. We create a new Animation and name it W. Activate all the attachments with a W direction in their name while the Autokey is toggled on, so the keyframes will be saved in the animation.
Using the duplicated skeleton as a reference, we reposition the bones to match the original position of the attachments. We also change the Draw Order as needed. We do the same for the North–West direction and place these two animations under a folder named directions. It is essential to save those animations, do not delete or overwrite them by mistake – we need those keyframes as a base for different animations in those directions.
For a squishy body and fins, we will create Meshes. To save time while creating the meshes for all the nine different body attachments, we can duplicate a mesh we already created and drag it to the Skin Placeholder of another skin. Don't forget to double click the attachment name and change it to the name of the relevant Skin.
We will create two identical bones, one we will split into two, and the other into six.
We will create a Path, by selecting the root bone and clicking on New > Path, and placed it according to the bones. Next, we select all the six split bones and create a Path Constraint, which we attach to the Path. The Path Constraint we bind to the two split bones, and the attachment Mesh, we bind to the six split bones.
Animation
When we animate a character in different directions, I prefer to finish animating all the animation in one direction before moving to animate another. This way, I can be sure I will not need to change an animation three different times if I needed any changes.
After animating all the South–West animations, we start animating the North–West direction. The most efficient way is to duplicate the NW animation from the direction bank we created. I copied the keyframes from a finished SW animation and placed it next to the NW keyframes.
Copying South–West animations to the West animations requires more adjustments. Again, we duplicate the W animation from our bank and place the keyframes from a South-West animation next to it. Copy and paste the W animation keyframes to the first and last SW animation keyframes. As the animation needs more adjustments, we find the keyframes in the middle, which make this mess and fix them.
So that's it, we now have a 2D shark animation, with three different skins in three directions.