Thank you for taking part in the NotSlot journey!
We invite you to join us in our next chapter:


2.5D Games in Unity Part 4: Gate/Door Hinge
In part four of 2.5D Game in Unity tutorial, we will add hinges for creating doors and gates in our 2.5D world. While at first, it may seem straightforward to implement, it’s quite tricky to implement in our 45 degrees rotated world.
Right of the bat, let’s look into why creating such a door or gate is problematic in our world.
We have in front of us a rotated sprite, here is the catch; let’s mimic a gate opening by rotating it on the Y-axis. When looking from the side, we can notice that when rotating the gate in world space detaches it from the fence. When we rotate the gate in its local space, we have a different issue – it collides into the ground.
To tackle the issues we encountered, we will first create the scene while keeping the physics objects separated from the visualization. After that, we will create a shader based on an idea that we discussed in the previous part. And eventually, we will create a script to connect the physics and the shader.
In this tutorial, I’m using the Universal Render Pipeline with Shader Graph. I’m working with Unity 2019.3, but this should work with any version that has support for Shader Graph.
Texture Configuration
This part is super simple, but crucial for our gate to work.
Whenever we import a sprite texture that is supposed to rotate on a hinge, we must remember to set its pivot to one of its bottom corners. I went ahead and imported sprites of a fence and a gate.
Scene Building
Let’s create a new scene. I want to create a composition of a two-part gate with a fence from each side. One thing vital before we go on is to recall from the first video of this tutorial that although we rotate our assets, we position the colliders perpendicular to the ground.
Let’s create a fence object, it should have a Rigidbody component marked as kinematic, and a box collider. Inside it, a child object rotated by 45 degrees on the X-axis and a sprite renderer with the fence sprite. Make sure the collider matches the size of the fence sprite.
Now, create a new object for the gate with two child objects – name one Renderer and the other Physics.
Add a sprite renderer component to the Renderer object, rotate it by 45 degrees on the X-axis, and set the gate sprite.
To the Physics object, we need to add three components, a Rigidbody, a box collider configured to match the sprite dimensions, and a Hinge Joint with the following configuration:
- The connected body should be the adjacent fence’s Rigidbody, set the anchor to the edge between the fence and the gate.
- The axis should be 1 for Y and 0 for the rest.
- Last, mark the Use Limits checkbox and configure it to have an appropriate opening angle.
- Duplicate the fence and the gate. Make the appropriate adjustments like connecting the correct fence to the Hinge and so on.
- Ensure the angle limits are correct for both sides.
Shader Graph
This shader contains a concept we have discussed and implemented in the previous part – if you haven’t watched it yet, I highly recommend you watch it now and then come back here.
Create a new Unlit Shader Graph and call it 2.5D Hinge. In the Blackboard, create two new properties.
A 2D texture named Texture with its reference named _MainTex, and a Vector1 called Angle and its reference named _Angle. Make sure both are marked as Exposed.
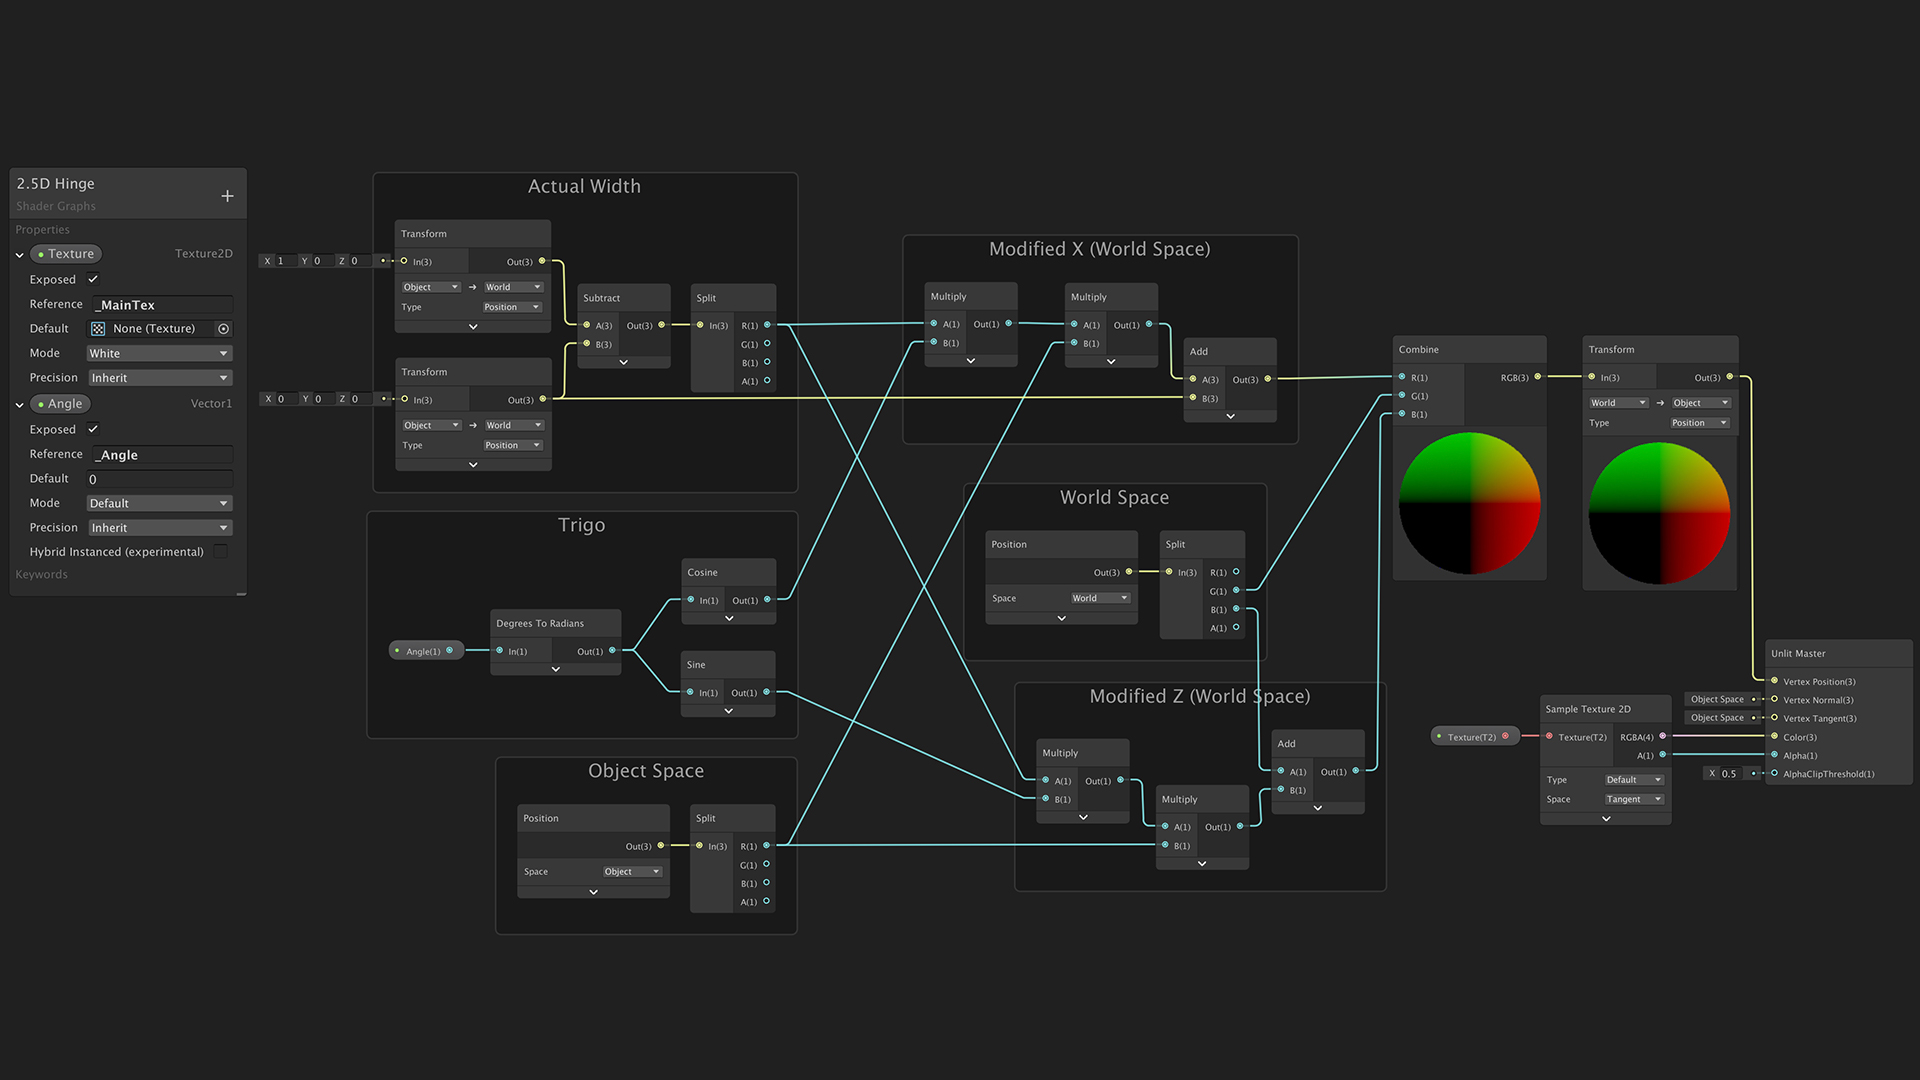
Configure the master node by clicking the cog on it. Set it up as a two-sided shader.
Next, drag the texture property from the Blackboard to the canvas. Create a Sample Texture 2D node and connect the texture property into it. Connect the RGBA and Alpha output slots from the Sampler to the master node’s Color and Alpha input slots.
Like the previous video, we need a foundation that manipulates the vertex position in world space and then converts it into object space for rendering.
Create a Transform node from World to Object space and connect it to the Vertex Position input slot of the master node.
Create a Combine node and connect its output into the Transform node’s input. We will later connect different components into it, but for now, let’s connect the world space position.
Create a Position node, and set it to World space, connect it into a new Split node so we would have access to each of the position components.
Connect each of the RGB output slots to the matching input slots of the Combine node.
What we want to do now is to modify the X and Z position of the vertices. We have an angle property that tells us how much is the gate pushed, and the more it pushed, we also want to push and rotate the gate.
The catch is that we don’t want to modify the vertices that are “connected” to the hinge – only the vertices that are far from it.
Before we actually modify the X and Z vertices, we will create the toolset used for modification.
First, we calculate the object’s width in world space. Create two Transform nodes from Object to World space.
The first one should be in position 1 for the X. The second one should be at the origin 0.
We add Subtract node and connect the Transform nodes into it. Finally, we connect to it a new Split node.
Next up, some simple trigonometry. Drag the Angle property from the Blackboard and connect it to a new Degrees to Radians node.
Now, we add Cosine and Sine nodes and connect the radians into them.
Last, we create a new Position node, and set it to Object space, connect it to a new Split node.
We can now modify the X position.
Create a Multiply node, connect into it the R output from the Width’s Split node, and the Cosine of the angle. Create another Multiply node and connect the previous multiplay node and the R output from the Object Space Split node. Now, we connect the Multiply node to a new Add node and the output of the origin vertex position in World Space.
We have a modified X position, and we can connect it to the R input slot of the Combine node.
On to modifying the Z position.
Like we did for the X position, create a Multiply node, connect into it the R output from the Width’s Split node, and the Sine of the angle. Create another Multiply node and connect the previous multiplay node and the R output from the Object Space Split node.
Now, connect the Multiply node to a new Add node and the output slot B of the World Space.
We now also have a modified Z position, and we can connect it to the B input slot of the Combine node.
That’s it for the shader. Save the Shader Graph asset. Create a new Material by right-clicking on the shader in the Project window and selecting create > material and name it Gate. Assign it to the sprite renderers of the gates.
Let’s move on to creating a script that will connect the Hinge and the shader.
Script
Create a new MonoBehaviour script and call it HingeSync.
using UnityEngine;

public class HingeSync : MonoBehaviour
{
  #region Connstants

  private static readonly int ANGLE = Shader.PropertyToID("_Angle");

  #endregion


  #region Inspector

  [SerializeField]
  private HingeJoint hinge = null;

  [SerializeField]
  private SpriteRenderer spriteRenderer = null;

  #endregion


  #region MonoBehaviour

  private void Update ()
  {
    float angle = -hinge.angle;
    spriteRenderer.material.SetFloat(ANGLE, angle);
  }

  #endregion
}
- We are creating a static property ID since it yields better performance.
- Be sure you are accessing the material and not the sharedMaterial as we want a different value for each instance.
To sum up, there is not much to this script; all it does is updating the shader to match the hinge rotation of every frame.
Add the script we created to each of the gates, don’t forget to drag into it the HingeJoint and the SpriteRenderer.
We now have a working gate with dynamic skewing to match our 2.5D game style!
In the next part, we will configure Cinemachine for our 2.5D style with interactive multi-cam switching.